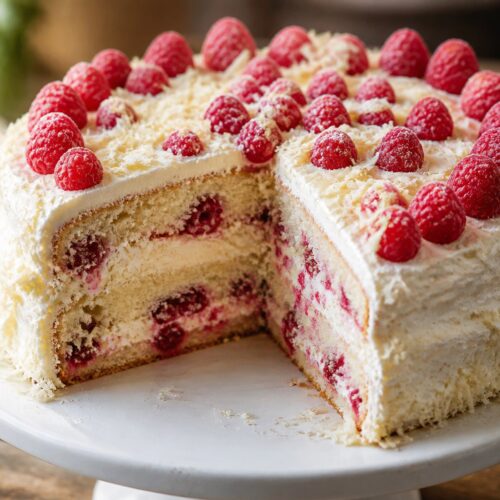
Mary Berry White Chocolate and Raspberry Cake

This Mary Berry White Chocolate and Raspberry Cake combines white chocolate, raspberries, butter, and cream into a rich but balanced cake.
Equipment
- Mixing bowls
- Hand mixer or wooden spoon
- Measuring cups
- Measuring spoons
- 2 round cake pans
- Rubber spatula
- Cooling rack
- Knife
- Cutting board
- Small saucepan
- Offset spatula or butter knife
Ingredients
For the Cake Layers
- 2 1/2 cups all-purpose flour
- 2 teaspoons baking powder
- 1/2 teaspoon salt
- 1 cup unsalted butter softened
- 1 3/4 cups granulated sugar
- 4 large eggs
- 1 teaspoon vanilla extract
- 3/4 cup whole milk
- 6 oz white chocolate melted and slightly cooled
- 1 1/2 cups fresh raspberries
For the White Chocolate Frosting
- 1 cup unsalted butter softened
- 3 cups powdered sugar
- 5 oz white chocolate melted and cooled
- 2 tablespoons heavy cream
- 1 teaspoon vanilla extract
For Decoration
- Extra raspberries
- White chocolate shavings
- Powdered sugar optional
Instructions
Step 1: Prepare the Cake Pans
- Preheat your oven to 350 degrees Fahrenheit. Grease two 8-inch round cake pans and line the bottoms with parchment paper.
- I used to skip parchment paper because I thought greasing the pans was enough, but one time half my cake stuck to the bottom and completely fell apart. Since then, I always use parchment.
- Set the prepared pans aside while you make the batter.
Step 2: Mix the Dry Ingredients
- In a medium mixing bowl, whisk together the flour, baking powder, and salt.
- You don’t need to overdo the whisking here. Just make sure the baking powder is evenly mixed so the cake rises properly.
- The flour mixture should look light and evenly combined without lumps.
Step 3: Cream the Butter and Sugar
- In a large bowl, beat the softened butter and sugar together using a hand mixer for about 3 to 4 minutes.
- The mixture should become lighter in color and fluffy-looking. If the butter still looks chunky, keep mixing a little longer.
- The first time I made this Mary Berry White Chocolate and Raspberry Cake, my butter was still slightly cold and the batter looked weirdly grainy. Letting the butter soften properly really helps.
Step 4: Add the Eggs and Vanilla
- Add the eggs one at a time, mixing after each addition. Then stir in the vanilla extract.
- If the batter looks slightly curdled at this stage, don’t panic. Mine usually does a little, especially during colder months. Once the flour goes in, it smooths back out.
- The batter should smell rich and buttery at this point.
Step 5: Add the Melted White Chocolate
- Slowly pour the melted white chocolate into the batter while mixing on low speed.
- Make sure the chocolate is not hot. Warm is okay, but hot chocolate can scramble the eggs or melt the butter too much.
- I noticed that using good-quality white chocolate makes the flavor taste smoother and less sugary.
Step 6: Add the Dry Ingredients and Milk
- Add half the flour mixture into the batter and mix gently. Pour in the milk, then add the remaining flour mixture.
- Mix just until combined. Overmixing can make the cake dense.
- The batter should look thick, creamy, and smooth.
Step 7: Fold in the Raspberries
- Gently fold the raspberries into the batter using a spatula.
- Try not to crush them too much. A few streaks of raspberry are fine though. Actually, I kind of like the little swirls because they make the cake look homemade.
- Fresh raspberries work best because frozen ones release more moisture.
Step 8: Bake the Cakes
- Divide the batter evenly between the prepared pans.
- Bake for 30 to 32 minutes or until the tops are lightly golden and a toothpick inserted into the center comes out mostly clean.
- Your kitchen will smell buttery and sweet while these bake.
- The cake tops should spring back lightly when touched.
Step 9: Cool the Cakes
- Let the cakes cool in the pans for about 10 minutes.
- Then carefully transfer them to a cooling rack to cool completely.
- Do not frost warm cakes. I made that mistake once and the frosting slid everywhere.
Step 10: Make the Frosting
- In a large bowl, beat the softened butter until creamy.
- Add the powdered sugar gradually, then mix in the melted white chocolate, heavy cream, and vanilla extract.
- The frosting should become smooth and fluffy after a few minutes.
- If it feels too soft, chill it in the refrigerator for 15 minutes before frosting the cake.
- What worked better for me was slightly cooling the frosting first because white chocolate frosting can get loose pretty quickly.
Step 11: Assemble the Cake
- Place one cake layer onto a serving plate.
- Spread a thick layer of frosting over the top, then add a small handful of fresh raspberries.
- Place the second cake layer on top and frost the top and sides.
- Don’t stress about making it perfectly smooth. Slightly messy homemade frosting honestly looks more inviting sometimes.
Step 12: Decorate and Serve
- Top the cake with extra raspberries and white chocolate shavings.
- You can dust a little powdered sugar on top if you want a softer bakery-style look.
- Slice and serve once the frosting has set slightly.
- The texture should be soft, creamy, and slightly fruity with little bursts of raspberry in each bite.
Notes
- Use room temperature ingredients for smoother batter.
- Chill the frosting briefly before spreading.
- Use a serrated knife for cleaner slices.
- Wipe the knife between slices for prettier presentation.
- Add raspberries on top right before serving so they stay fresh-looking.
- Use good-quality white chocolate bars instead of chips.