Personal Introduction
The first time I made this Joanna Gaines Scalloped Potatoes Recipe, it was for a family dinner right before Thanksgiving.
I wanted something cozy and homemade that felt a little more special than regular mashed potatoes, but still simple enough that I wouldn’t completely stress myself out in the kitchen.
Honestly, I was nervous because scalloped potatoes can go wrong fast. I’ve made versions before that turned out watery, bland, or somehow both at the same time.
But this one surprised me.
The potatoes turned soft and creamy without falling apart, and the cheesy sauce baked into all the layers instead of separating.
My family basically scraped the dish clean.
Now I make these scalloped potatoes for holidays, Sunday dinners, and random cold-weather evenings when comfort food just sounds right.
I noticed this recipe tastes even better after sitting for a few minutes out of the oven. The sauce thickens slightly and the flavors settle together.
And honestly, the smell alone while it bakes makes the whole house feel warm.
Why This Recipe Works
This recipe works because it keeps things simple.
Thinly sliced potatoes cook evenly and soak up the creamy sauce better. The combination of heavy cream, cheese, butter, and garlic creates richness without tasting too heavy.
Using russet potatoes helps too.
They release a little starch while baking, which naturally thickens the sauce.
I noticed when I tried waxy potatoes once, the texture wasn’t nearly as creamy.
The layered method also matters.
Instead of dumping everything together, layering the potatoes with sauce and cheese helps every bite taste balanced.
And baking the dish covered first keeps the potatoes tender before the top gets golden and bubbly.
What worked better for me was letting the potatoes rest about 10 minutes before serving.
Otherwise the sauce runs everywhere.
Equipment Needed
You don’t need fancy kitchen equipment for this recipe.
- 9×13-inch baking dish
- Large skillet or saucepan
- Knife
- Cutting board
- Mixing spoon or spatula
- Measuring cups and spoons
- Cheese grater
- Aluminum foil
- Oven mitts
- Mandoline slicer (optional but helpful)
Recipe Card
Joanna Gaines Scalloped Potatoes Recipe
Prep Time: 25 minutes
Cook Time: 1 hour 20 minutes
Total Time: 1 hour 45 minutes
Servings: 8 servings
Cuisine: American Comfort Food
Course: Dinner
Calories: About 430 calories per serving
Ingredients
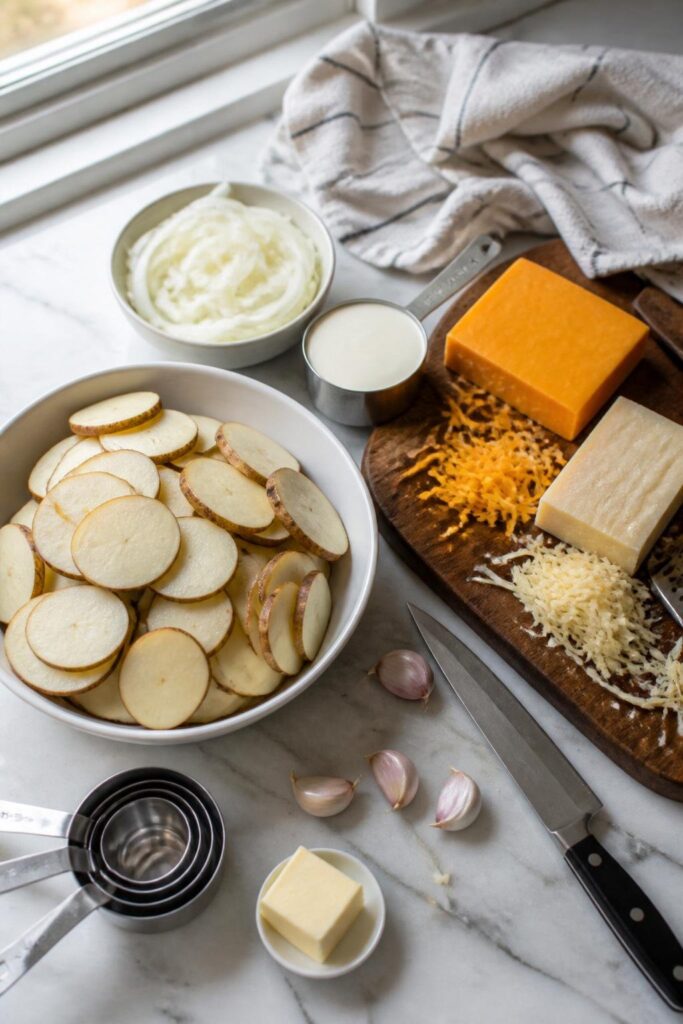
- 3 lbs russet potatoes, peeled and thinly sliced
- 3 tablespoons butter
- 1 small yellow onion, thinly sliced
- 3 garlic cloves, minced
- 3 tablespoons all-purpose flour
- 2 cups whole milk
- 1 cup heavy cream
- 2 cups shredded sharp cheddar cheese
- 1/2 cup grated Parmesan cheese
- 1 teaspoon salt
- 1/2 teaspoon black pepper
- 1/2 teaspoon paprika
- Fresh parsley for garnish
Step-by-Step Instructions
Step 1: Prepare the Potatoes
Preheat your oven to 375°F.
Peel and thinly slice the potatoes.
Try to keep the slices around 1/8 inch thick so they cook evenly.
A mandoline helps, but honestly I usually just use a knife because dragging out another kitchen gadget feels like extra work.
Place the sliced potatoes in a bowl of cold water while preparing everything else.
This helps remove excess starch.
Step 2: Cook the Onion and Garlic
In a large skillet, melt the butter over medium heat.
Add the sliced onions and cook for about 5 minutes until softened.
Stir occasionally so they don’t brown too much.
Add the minced garlic and cook for another 30 seconds.
The smell at this point is pretty incredible already.
Step 3: Make the Cream Sauce
Sprinkle the flour into the skillet.
Stir constantly for about 1 minute.
The mixture will look thick and slightly pasty.
Slowly pour in the milk while whisking.
Add the heavy cream and continue stirring until smooth.
Cook for 3 to 5 minutes until the sauce thickens slightly.
Add salt, pepper, paprika, and half the cheddar cheese.
Stir until melted.
The sauce should look creamy and smooth.
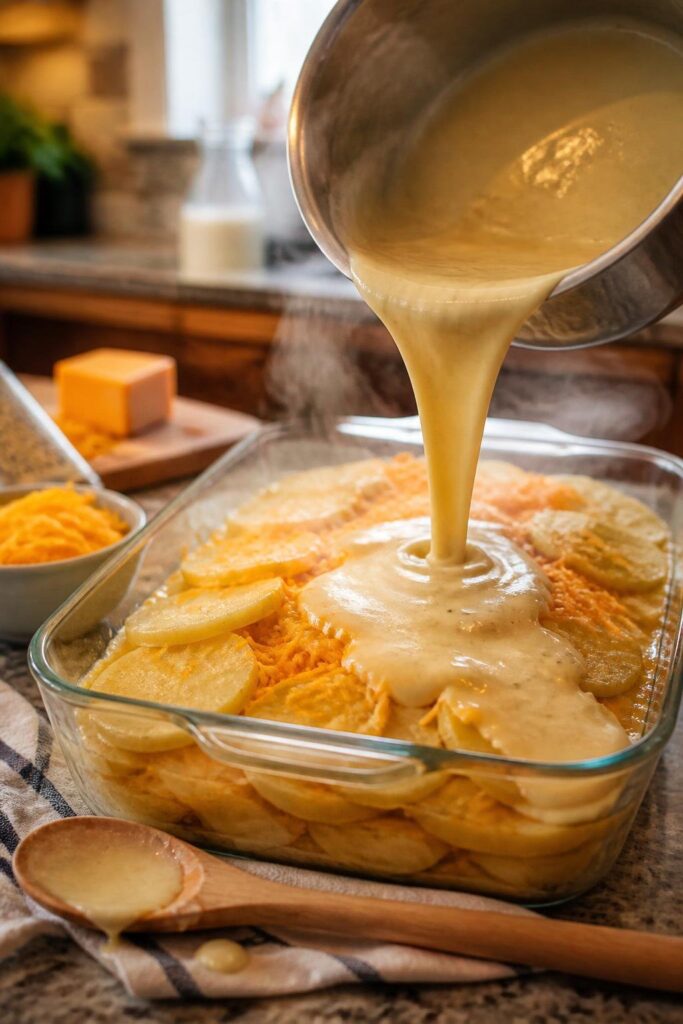
Step 4: Layer the Potatoes
Drain the potatoes and pat them dry lightly.
Arrange half the potato slices in the baking dish.
Pour half the sauce over the potatoes.
Sprinkle a little Parmesan cheese on top.
Repeat with the remaining potatoes and sauce.
Top everything with the rest of the cheddar cheese and Parmesan.
Don’t worry if the layers aren’t perfect.
Mine never are.
Step 5: Bake Covered
Cover the baking dish tightly with foil.
Bake for 50 minutes.
This part softens the potatoes without drying the top out.
Step 6: Bake Uncovered
Remove the foil carefully.
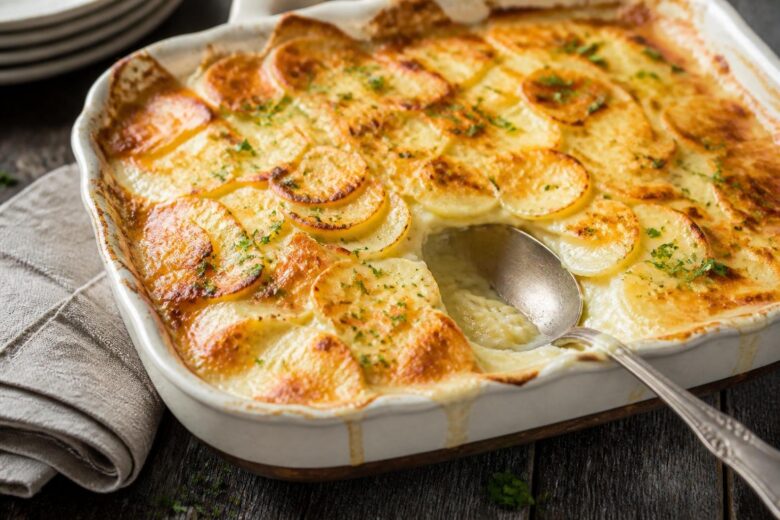
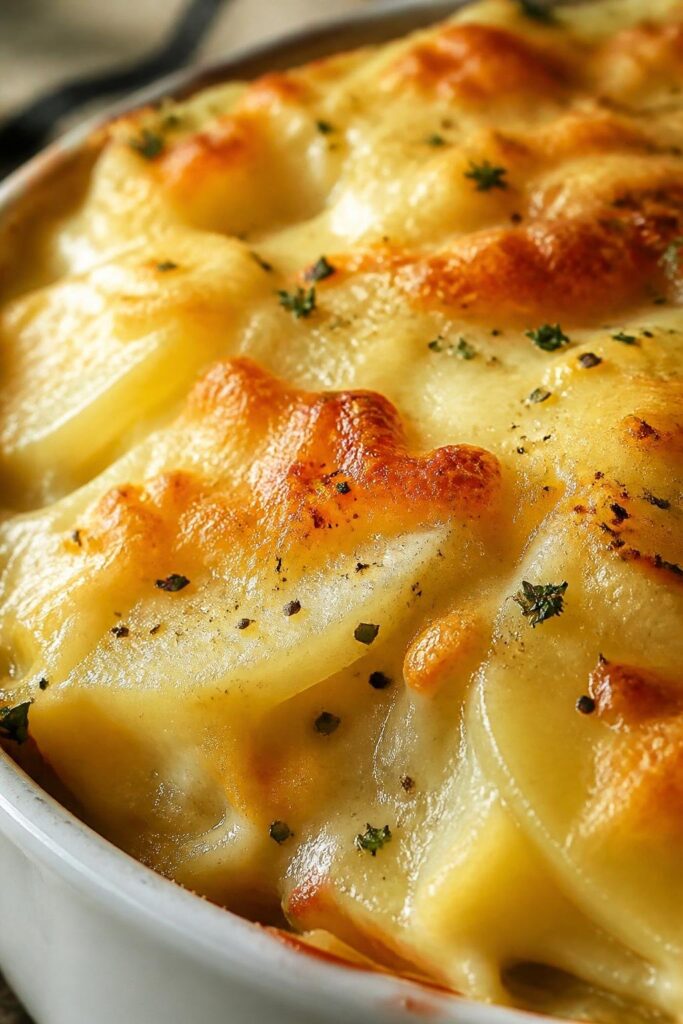
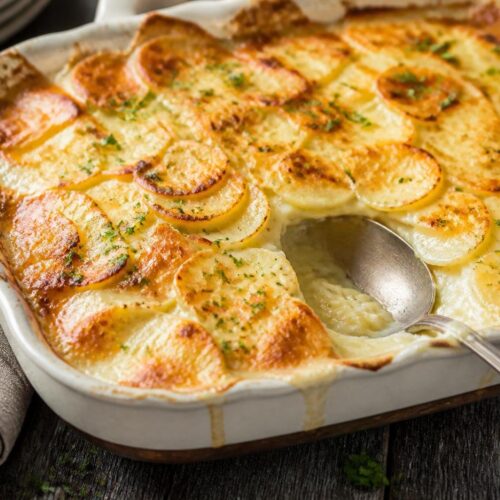
Bake another 25 to 30 minutes until golden brown and bubbling around the edges.
The top should have crispy cheesy spots.
If you want extra browning, broil for 2 minutes at the end.
But keep an eye on it because cheese can go from golden to burnt pretty fast.
Step 7: Rest Before Serving
Let the scalloped potatoes sit for about 10 minutes before serving.
This helps the sauce thicken.
Sprinkle fresh parsley over the top before serving.
Common Mistakes to Avoid
Slicing Potatoes Too Thick
Thick potato slices take much longer to cook.
Thin even slices work best.
Skipping the Resting Time
Fresh out of the oven, the sauce can look thin.
Resting helps everything settle.
Using Pre-Shredded Cheese
Pre-shredded cheese doesn’t melt as smoothly because of anti-caking ingredients.
Freshly grated cheese tastes better here.
Not Covering the Dish Initially
Without foil, the top browns too fast before the potatoes soften.
Underseasoning the Sauce
Potatoes absorb a lot of flavor.
Taste the sauce before assembling.
Pro Tips
- Use freshly shredded cheddar for the creamiest texture.
- Russet potatoes create the best soft layers.
- Add a pinch of cayenne for subtle warmth.
- Let the dish rest before slicing.
- Place the baking dish on a sheet pan in case the sauce bubbles over.
- I noticed leftovers taste even creamier the next day.
- What worked better for me was slightly undercooking the onions so they finish softening in the oven.
Variations
Bacon Scalloped Potatoes
Add cooked crumbled bacon between the layers.
Gruyere Cheese Version
Swap some cheddar for Gruyere cheese.
The flavor becomes richer and slightly nutty.
Ham and Potato Bake
Add diced cooked ham to turn this into more of a main dish.
Spicy Version
Add diced jalapenos or extra cayenne pepper.
Herb Scalloped Potatoes
Mix fresh thyme or rosemary into the sauce.
Serving Ideas
These scalloped potatoes pair really well with:
- Roast chicken
- Meatloaf
- Ham
- Steak
- Pork chops
- Turkey dinner
- Green beans
- Caesar salad
I especially like serving them during holidays because they hold heat pretty well on the table.
And honestly, they’re one of those side dishes people secretly want more of than the main course.
Make-Ahead Tips
You can assemble the dish up to one day ahead.
Cover tightly and refrigerate before baking.
When ready to cook, let the dish sit at room temperature for about 20 minutes first.
You may need to add a few extra minutes to the bake time.
I’ve also baked the entire dish earlier in the day and reheated it before dinner.
Still tasted great.
Storage & Reheating Tips
Refrigerator Storage
Store leftovers covered in the fridge for up to 4 days.
Freezer Storage
You can freeze scalloped potatoes, though the sauce texture may change slightly.
Freeze tightly wrapped for up to 2 months.
Reheating in the Oven
Cover with foil and bake at 350°F until warmed through.
Microwave Reheating
Heat individual portions in short intervals.
The first time I microwaved leftovers too aggressively, the cheese turned oily around the edges.
Slower reheating works better.
Frequently Asked Questions
What potatoes work best for scalloped potatoes?
Russet potatoes are best because they become soft and creamy.
Can I make this recipe ahead of time?
Yes.
It actually reheats very well.
Can I use different cheese?
Absolutely.
Gruyere, Monterey Jack, or mozzarella all work.
Why are my scalloped potatoes watery?
Usually the sauce wasn’t thick enough before baking or the potatoes released too much moisture.
Do I need to peel the potatoes?
Not necessarily.
But peeled potatoes give the classic creamy texture.
Can I add meat?
Yes.
Ham or bacon work especially well.
Final Thoughts
This Joanna Gaines Scalloped Potatoes Recipe became one of those comfort food dishes I keep returning to because it feels cozy without being complicated.
The creamy cheese sauce, soft potato layers, and golden crispy top all come together into something that feels homemade in the best possible way.
It’s the kind of side dish people talk about after dinner.
And honestly, the leftovers might be even better the next day.
I like that the recipe works for holidays but also doesn’t feel too fancy for regular family dinners.
That balance is hard to find sometimes.
If you try this recipe, don’t stress about perfectly neat layers or flawless presentation.
A little bubbling cheese around the edges and uneven golden spots actually make it look more homemade and comforting.
And if somebody sneaks a spoonful straight from the baking dish before dinner starts… that happens in my kitchen almost every single time.
Joanna Gaines Scalloped Potatoes Recipe
Equipment
- 9×13-inch baking dish
- Large skillet or saucepan
- Knife
- Cutting board
- Mixing spoon or spatula
- Measuring cups and spoons
- Cheese grater
- Aluminum foil
- Oven mitts
- Mandoline slicer (optional but helpful)
Ingredients
- 3 lbs russet potatoes peeled and thinly sliced
- 3 tablespoons butter
- 1 small yellow onion thinly sliced
- 3 garlic cloves minced
- 3 tablespoons all-purpose flour
- 2 cups whole milk
- 1 cup heavy cream
- 2 cups shredded sharp cheddar cheese
- 1/2 cup grated Parmesan cheese
- 1 teaspoon salt
- 1/2 teaspoon black pepper
- 1/2 teaspoon paprika
- Fresh parsley for garnish
Instructions
Step 1: Prepare the Potatoes
- Preheat your oven to 375°F.
- Peel and thinly slice the potatoes.
- Try to keep the slices around 1/8 inch thick so they cook evenly.
- A mandoline helps, but honestly I usually just use a knife because dragging out another kitchen gadget feels like extra work.
- Place the sliced potatoes in a bowl of cold water while preparing everything else.
- This helps remove excess starch.
Step 2: Cook the Onion and Garlic
- In a large skillet, melt the butter over medium heat.
- Add the sliced onions and cook for about 5 minutes until softened.
- Stir occasionally so they don’t brown too much.
- Add the minced garlic and cook for another 30 seconds.
- The smell at this point is pretty incredible already.
Step 3: Make the Cream Sauce
- Sprinkle the flour into the skillet.
- Stir constantly for about 1 minute.
- The mixture will look thick and slightly pasty.
- Slowly pour in the milk while whisking.
- Add the heavy cream and continue stirring until smooth.
- Cook for 3 to 5 minutes until the sauce thickens slightly.
- Add salt, pepper, paprika, and half the cheddar cheese.
- Stir until melted.
- The sauce should look creamy and smooth.
Step 4: Layer the Potatoes
- Drain the potatoes and pat them dry lightly.
- Arrange half the potato slices in the baking dish.
- Pour half the sauce over the potatoes.
- Sprinkle a little Parmesan cheese on top.
- Repeat with the remaining potatoes and sauce.
- Top everything with the rest of the cheddar cheese and Parmesan.
- Don’t worry if the layers aren’t perfect.
- Mine never are.
Step 5: Bake Covered
- Cover the baking dish tightly with foil.
- Bake for 50 minutes.
- This part softens the potatoes without drying the top out.
Step 6: Bake Uncovered
- Remove the foil carefully.
- Bake another 25 to 30 minutes until golden brown and bubbling around the edges.
- The top should have crispy cheesy spots.
- If you want extra browning, broil for 2 minutes at the end.
- But keep an eye on it because cheese can go from golden to burnt pretty fast.
Step 7: Rest Before Serving
- Let the scalloped potatoes sit for about 10 minutes before serving.
- This helps the sauce thicken.
- Sprinkle fresh parsley over the top before serving.
Notes
- Use freshly shredded cheddar for the creamiest texture.
- Russet potatoes create the best soft layers.
- Add a pinch of cayenne for subtle warmth.
- Let the dish rest before slicing.
- Place the baking dish on a sheet pan in case the sauce bubbles over.
- I noticed leftovers taste even creamier the next day.
- What worked better for me was slightly undercooking the onions so they finish softening in the oven.