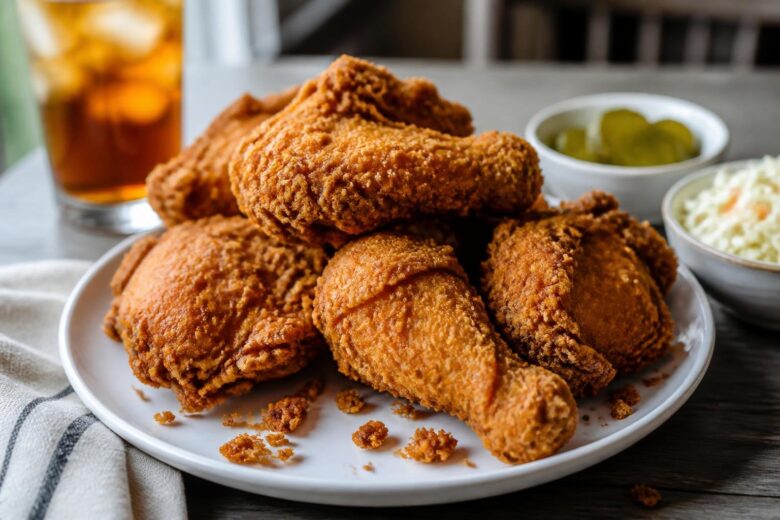
Introduction
The first time I tried making Gus’s Fried Chicken Recipe at home, I honestly thought I had messed it up before the chicken even hit the oil.
I let the chicken sit in the buttermilk too long, my kitchen smelled like hot grease for two days, and I burned the first batch because the oil got way too hot while I was distracted helping my kid with homework.
Still, that second batch came out so crispy and juicy that everybody stood around the stove eating pieces before dinner was even ready.
Ever since then, this recipe has become one of those weekend meals I make when people are actually hungry-hungry. Not snack hungry. Real hungry. It’s spicy, crunchy, messy in the best way, and somehow tastes even better the next day straight from the fridge.
I’ve tried a lot of fried chicken recipes over the years. Some were too greasy, some had breading that slid right off, and a few tasted more like plain flour than actual chicken.
What worked better for me was keeping things simple and focusing on seasoning every layer. The marinade matters. The flour matters. Even letting the chicken rest before frying matters more than I realized.
This version has the crispy coating I wanted without being too thick, plus enough seasoning that every bite tastes good all the way through.
And yes, your kitchen will probably get a little messy. Fried chicken just does that.
Why This Recipe Works
There are a few practical reasons this recipe turns out so good.
First, the buttermilk tenderizes the chicken without making it mushy. I noticed that even cheaper cuts of chicken stayed juicy after frying.
Second, the flour mixture has both flour and cornstarch. The cornstarch helps the coating fry up extra crisp instead of heavy.
The seasoning is layered too. There’s spice in the marinade and in the flour coating, so the flavor doesn’t disappear after frying.
Another thing that helps is letting the coated chicken sit for about 10 minutes before frying. That little rest time helps the breading stick way better.
And finally, frying in small batches keeps the oil temperature steady. The first time I made this, I crowded the pan because I was impatient. Big mistake. The coating turned soggy instead of crisp.
Equipment Needed
You don’t need fancy equipment for this recipe. Just regular kitchen stuff most people already have.
- Large skillet or deep frying pan
- Medium pot or Dutch oven
- Tongs
- Mixing bowls
- Measuring cups and spoons
- Knife
- Cutting board
- Wooden spoon or spatula
- Wire rack or paper towels
- Baking sheet or large plate
Recipe Card
Gus’s Fried Chicken Recipe Summary
Prep Time: 20 minutes
Cook Time: 30 minutes
Marinate Time: 4 hours
Total Time: 4 hours 50 minutes
Servings: 6 servings
Cuisine: Southern American
Course: Dinner
Calories: About 520 calories per serving
Ingredients
For the Chicken Marinade
- 3 pounds bone-in chicken pieces
- 2 cups buttermilk
- 1 tablespoon hot sauce
- 2 teaspoons salt
- 1 teaspoon black pepper
- 1 teaspoon garlic powder
- 1 teaspoon paprika
For the Flour Coating
- 2 cups all-purpose flour
- 1/2 cup cornstarch
- 1 tablespoon paprika
- 2 teaspoons garlic powder
- 1 teaspoon onion powder
- 1 teaspoon cayenne pepper
- 2 teaspoons salt
- 1 teaspoon black pepper
- 1 teaspoon seasoned salt
For Frying
- Vegetable oil or peanut oil for frying
Step-by-Step Instructions
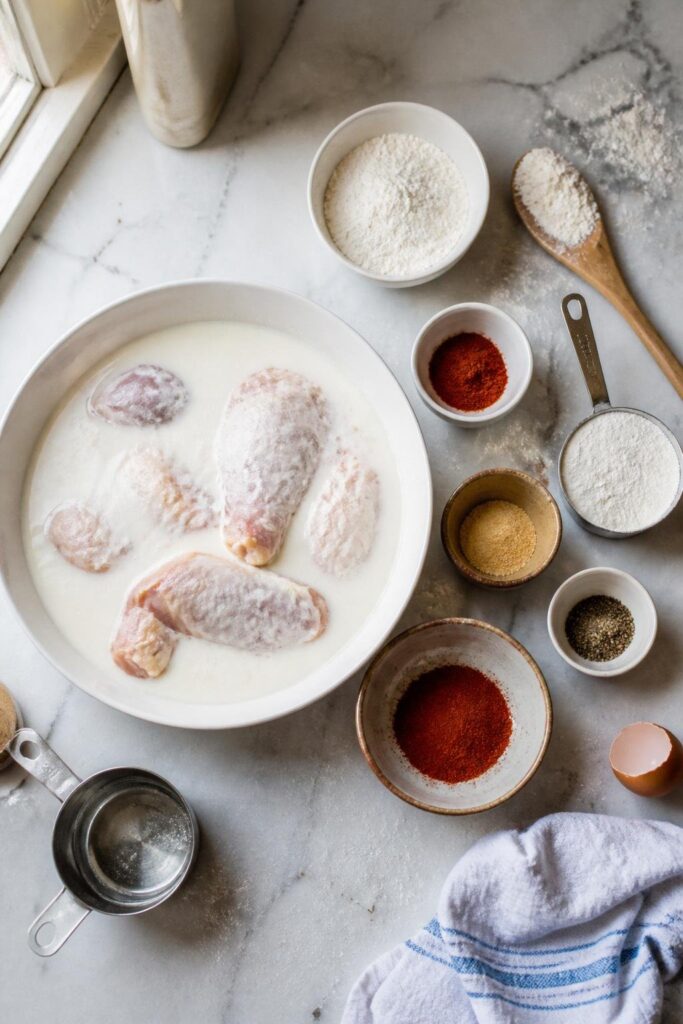
Step 1: Marinate the Chicken
Put the chicken pieces in a large bowl or zip-top bag. Pour in the buttermilk and hot sauce. Add the salt, pepper, garlic powder, and paprika.
Mix everything together until all the chicken is coated.
Cover the bowl and refrigerate for at least 4 hours. Overnight is even better if you have time.
I usually do this in the morning before work so dinner is easier later.
Step 2: Make the Seasoned Flour
In a separate large bowl, mix together the flour, cornstarch, paprika, garlic powder, onion powder, cayenne, salt, pepper, and seasoned salt.
Use a fork or whisk so the spices spread evenly.
The first time I skipped mixing properly and ended up with one super salty drumstick and one completely bland thigh. Not great.
Step 3: Heat the Oil
Pour about 2 inches of oil into a deep skillet or pot.
Heat the oil over medium heat until it reaches around 350°F.
If you don’t have a thermometer, drop a pinch of flour into the oil. If it sizzles right away but doesn’t burn instantly, the oil is usually ready.
Try not to rush this part. Oil that’s too cool makes greasy chicken.
Step 4: Coat the Chicken
Take one piece of chicken out of the buttermilk and let the extra drip off.
Press the chicken into the flour mixture really well. I mean really press it in there.
You want little craggy bits and rough spots because those become the crispiest parts after frying.
Place the coated chicken on a plate or baking sheet.
Repeat with all the pieces.
Let the chicken sit for about 10 minutes before frying.
That resting time helps the coating stick instead of falling off into the oil.
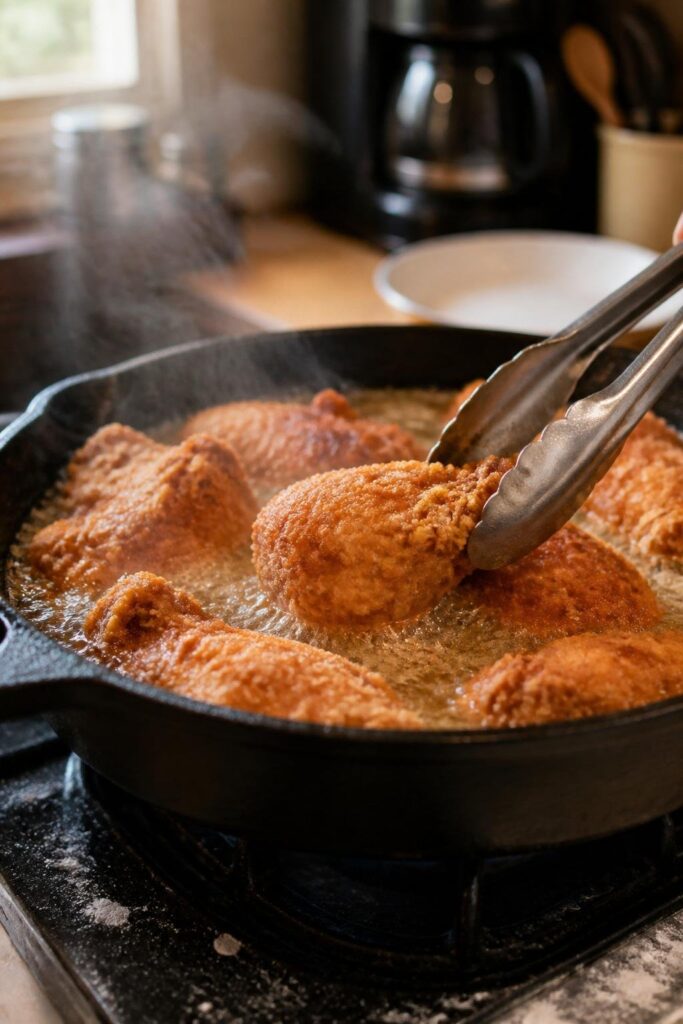
Step 5: Fry the Chicken
Carefully place 3 or 4 pieces of chicken into the hot oil.
Do not overcrowd the pan.
Fry the chicken for about 12 to 15 minutes per batch, turning occasionally.
The outside should turn deep golden brown and smell amazing.
You’ll hear the bubbling slow down slightly when the chicken is close to done.
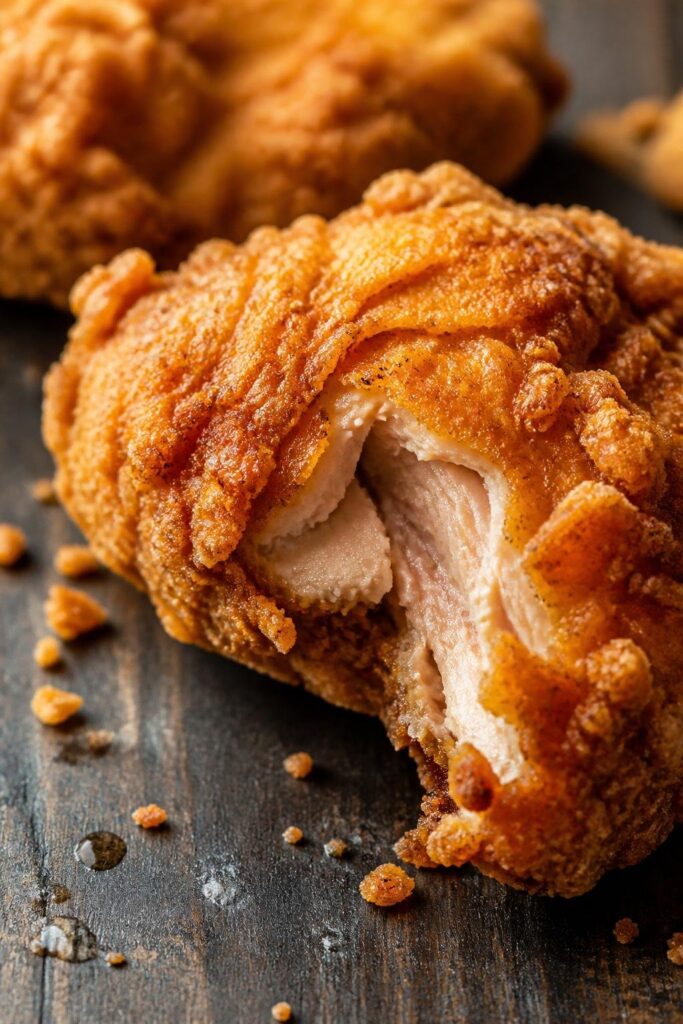
The internal temperature should reach 165°F.
Drumsticks usually cook a little faster than thick breasts.
Step 6: Drain and Rest
Move the fried chicken to a wire rack or paper towel-lined plate.
Let it rest for about 5 minutes before serving.
I know people always want to grab a piece immediately, but the coating stays crunchier if you wait a few minutes.
Common Mistakes to Avoid
Using Cold Chicken Straight From the Fridge
Very cold chicken can lower the oil temperature fast.
I usually let the chicken sit out for about 20 minutes before frying.
Crowding the Pan
Too much chicken in the pan drops the oil temperature and creates soggy breading.
Small batches work better even if it takes longer.
Skipping the Rest Before Frying
This one matters more than people think.
Letting the coated chicken rest helps the breading stick.
Oil That’s Too Hot
I burned one batch because I walked away while heating the oil.
The outside got dark way before the inside cooked.
Medium heat is safer than blasting the burner high.
Not Seasoning Enough
Fried chicken needs seasoning in layers.
If the flour isn’t seasoned well, the crust tastes plain no matter how good the chicken is.
Pro Tips
- Use bone-in chicken for the juiciest results.
- Thighs and drumsticks stay more tender than breasts.
- A little cornstarch in the flour makes a crispier crust.
- Keep fried chicken warm in a 200°F oven while finishing batches.
- Let the oil return to temperature between batches.
- Use tongs instead of forks so you don’t tear the coating.
One thing I noticed after making this recipe a bunch of times is that slightly uneven coating actually tastes better. Those crunchy little flakes fry up extra crisp.
Variations
Extra Spicy Version
Add another teaspoon of cayenne pepper plus a few dashes of hot sauce to the marinade.
Mild Family Version
Reduce the cayenne and add a little smoked paprika instead.
Boneless Version
You can use boneless chicken thighs.
Just reduce the cooking time since boneless pieces cook faster.
Air Fryer Option
This honestly won’t taste exactly the same, but it still works.
Spray the coated chicken well with oil and air fry at 375°F until crispy and cooked through.
Gluten-Free Option
Use a gluten-free flour blend instead of regular flour.
I tested this once for my cousin and it actually came out pretty good.
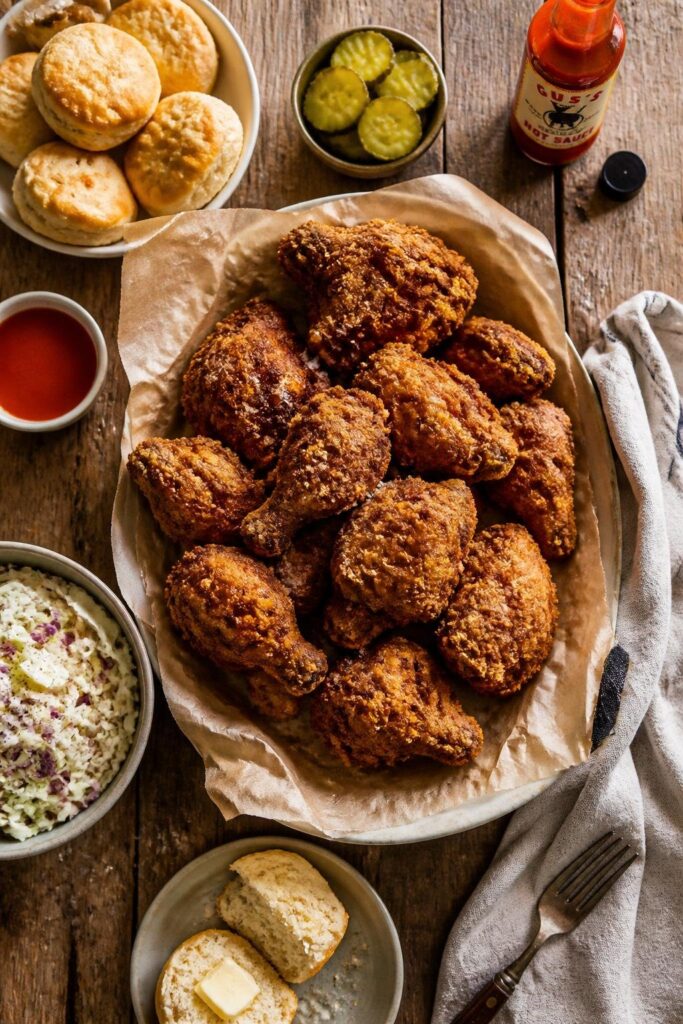
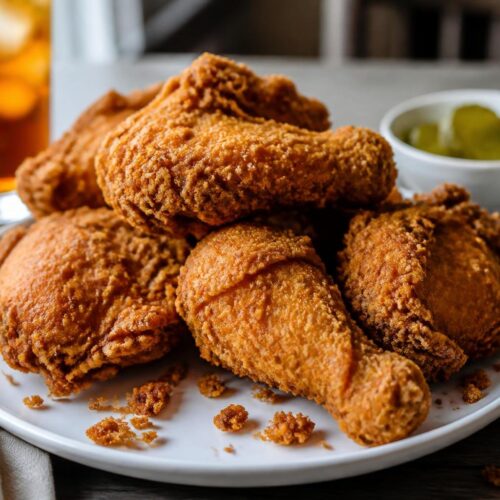
Serving Ideas
This fried chicken goes really well with simple comfort-food sides.
Some favorites at my house are:
- Mac and cheese
- Coleslaw
- Buttermilk biscuits
- Potato salad
- Cornbread
- Pickles
- Baked beans
- Mashed potatoes
- Sweet tea
- Lemonade
Sometimes we make sandwiches the next day with leftover chicken, pickles, and mayo on soft buns.
Honestly, that might be my favorite way to eat it.
Make-Ahead Tips
You can marinate the chicken up to 24 hours ahead.
The seasoned flour mixture can also be mixed ahead of time and stored in an airtight container.
If you want to save time before dinner, coat the chicken about 30 minutes early and keep it on a baking sheet in the fridge.
That extra chill time actually helps the crust stay attached during frying.
Storage & Reheating Tips
Storing Leftovers
Store leftover fried chicken in an airtight container in the fridge for up to 4 days.
Try not to stack the pieces too tightly or the crust softens faster.
Reheating in the Oven
This is the best reheating method.
Place the chicken on a baking sheet and bake at 375°F for about 15 minutes.
The crust gets crispy again instead of soggy.
Reheating in the Air Fryer
Air fry at 350°F for 5 to 7 minutes.
This works surprisingly well.
Microwave Option
You can microwave it if you’re in a hurry, but the crust gets soft.
I still do it sometimes for lunch leftovers though.
FAQs
Why does my fried chicken coating fall off?
Usually it’s because the chicken was too wet or the coating didn’t rest before frying.
Letting the coated chicken sit for 10 minutes helps a lot.
Can I use boneless chicken?
Yes.
Boneless thighs work especially well.
Just lower the cooking time so they don’t dry out.
What oil is best for frying?
Vegetable oil, canola oil, or peanut oil all work well because they handle high heat.
How do I know when the chicken is done?
The safest way is using a thermometer.
Chicken should reach 165°F internally.
The juices should also run clear.
Can I freeze fried chicken?
Yes.
Let it cool completely first, then freeze in airtight containers.
Reheat in the oven for best texture.
Why is my fried chicken greasy?
Usually the oil temperature was too low.
The chicken absorbs extra oil instead of crisping up.
Final Thoughts
This Gus’s Fried Chicken Recipe is one of those meals that feels worth the effort every single time. It’s crispy, flavorful, a little messy, and very hard to stop eating once you start.
The first few times I made fried chicken at home, I expected it to taste exactly like restaurant chicken. It didn’t. But after a while, I realized homemade fried chicken has its own thing going for it. The crust is rougher, the seasoning feels more personal, and honestly, it tastes more comforting.
What worked better for me was slowing down a little and not trying to rush the frying process.
If you give this recipe a try, don’t stress too much about making every piece look perfect. Some pieces always come out darker or crunchier than others. That’s kind of the charm of homemade fried chicken.
And if somebody sneaks a piece straight off the cooling rack before dinner, that usually means you did it right.
Gus’s Fried Chicken Recipe
Equipment
- Large skillet or deep frying pan
- Medium pot or Dutch oven
- Tongs
- Mixing bowls
- Measuring cups and spoons
- Knife
- Cutting board
- Wooden spoon or spatula
- Wire rack or paper towels
- Baking sheet or large plate
Ingredients
For the Chicken Marinade
- 3 pounds bone-in chicken pieces
- 2 cups buttermilk
- 1 tablespoon hot sauce
- 2 teaspoons salt
- 1 teaspoon black pepper
- 1 teaspoon garlic powder
- 1 teaspoon paprika
For the Flour Coating
- 2 cups all-purpose flour
- 1/2 cup cornstarch
- 1 tablespoon paprika
- 2 teaspoons garlic powder
- 1 teaspoon onion powder
- 1 teaspoon cayenne pepper
- 2 teaspoons salt
- 1 teaspoon black pepper
- 1 teaspoon seasoned salt
For Frying
- Vegetable oil or peanut oil for frying
Instructions
Step 1: Marinate the Chicken
- Put the chicken pieces in a large bowl or zip-top bag. Pour in the buttermilk and hot sauce. Add the salt, pepper, garlic powder, and paprika.
- Mix everything together until all the chicken is coated.
- Cover the bowl and refrigerate for at least 4 hours. Overnight is even better if you have time.
- I usually do this in the morning before work so dinner is easier later.
Step 2: Make the Seasoned Flour
- In a separate large bowl, mix together the flour, cornstarch, paprika, garlic powder, onion powder, cayenne, salt, pepper, and seasoned salt.
- Use a fork or whisk so the spices spread evenly.
- The first time I skipped mixing properly and ended up with one super salty drumstick and one completely bland thigh. Not great.
Step 3: Heat the Oil
- Pour about 2 inches of oil into a deep skillet or pot.
- Heat the oil over medium heat until it reaches around 350°F.
- If you don’t have a thermometer, drop a pinch of flour into the oil. If it sizzles right away but doesn’t burn instantly, the oil is usually ready.
- Try not to rush this part. Oil that’s too cool makes greasy chicken.
Step 4: Coat the Chicken
- Take one piece of chicken out of the buttermilk and let the extra drip off.
- Press the chicken into the flour mixture really well. I mean really press it in there.
- You want little craggy bits and rough spots because those become the crispiest parts after frying.
- Place the coated chicken on a plate or baking sheet.
- Repeat with all the pieces.
- Let the chicken sit for about 10 minutes before frying.
- That resting time helps the coating stick instead of falling off into the oil.
Step 5: Fry the Chicken
- Carefully place 3 or 4 pieces of chicken into the hot oil.
- Do not overcrowd the pan.
- Fry the chicken for about 12 to 15 minutes per batch, turning occasionally.
- The outside should turn deep golden brown and smell amazing.
- You’ll hear the bubbling slow down slightly when the chicken is close to done.
- The internal temperature should reach 165°F.
- Drumsticks usually cook a little faster than thick breasts.
Step 6: Drain and Rest
- Move the fried chicken to a wire rack or paper towel-lined plate.
- Let it rest for about 5 minutes before serving.
- I know people always want to grab a piece immediately, but the coating stays crunchier if you wait a few minutes.
Notes
- Use bone-in chicken for the juiciest results.
- Thighs and drumsticks stay more tender than breasts.
- A little cornstarch in the flour makes a crispier crust.
- Keep fried chicken warm in a 200°F oven while finishing batches.
- Let the oil return to temperature between batches.
- Use tongs instead of forks so you don’t tear the coating.