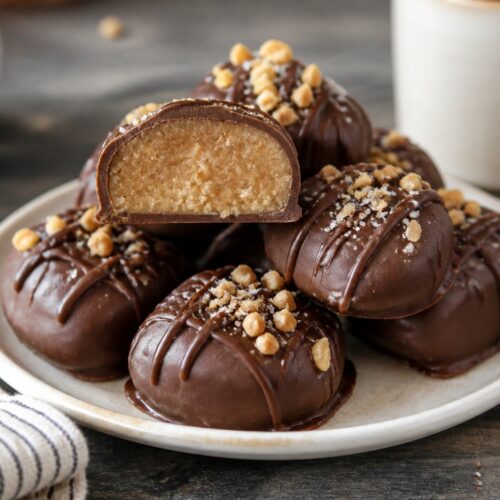
Maple Nut Goodies Recipe
This Maple Nut Goodies Recipe uses maple syrup, chocolate chips, peanuts, and peanut butter for homemade candy with rich flavor.
Equipment
- Medium saucepan
- Mixing bowl
- Spoon or spatula
- Baking sheet or tray
- Parchment paper
- Knife
- Cutting board
- Microwave-safe bowl
- Fork or dipping tool
- Measuring cups
- Measuring spoons
Ingredients
Maple Peanut Filling
- 2 cups roasted salted peanuts
- 1/2 cup creamy peanut butter
- 1/4 cup real maple syrup
- 2 tablespoons unsalted butter
- 1 teaspoon maple extract
- 1 cup powdered sugar
- 1/4 teaspoon salt
Chocolate Coating
- 2 cups semi-sweet chocolate chips
- 1 tablespoon coconut oil or shortening
Optional Toppings
- Crushed peanuts
- Flaky sea salt
- Extra melted chocolate drizzle
Instructions
Step 1: Prepare the Tray
- Line a baking sheet or tray with parchment paper.
- Make sure you clear some refrigerator space beforehand because the candies need chilling later.
- I forgot this once and ended up balancing a tray on top of leftover pizza boxes.
Step 2: Make the Maple Filling
- In a medium saucepan over low heat, combine the peanut butter, maple syrup, butter, maple extract, and salt.
- Stir slowly until everything melts together into a smooth mixture.
- The smell at this point is honestly amazing. You’ll notice the maple scent gets stronger after the butter melts.
- Don’t rush this part with high heat because maple syrup can scorch pretty quickly.
Step 3: Add the Powdered Sugar
- Remove the saucepan from the heat.
- Slowly stir in the powdered sugar until the mixture thickens.
- It should look soft but still scoopable.
- If the mixture feels too sticky, add another tablespoon or two of powdered sugar.
- The first time I made this Maple Nut Goodies Recipe, I skipped this adjustment and the filling stayed way too soft for shaping.
Step 4: Add the Peanuts
- Fold the roasted peanuts into the maple mixture.
- Stir until the peanuts are fully coated.
- The mixture should feel chunky and thick.
- Some peanuts may stick out a little and that’s totally fine. Homemade candy honestly looks better slightly imperfect.
Step 5: Shape the Candies
- Scoop small portions of the mixture and shape them into rough oval or rectangular candy shapes.
- Place them onto the parchment-lined tray.
- Don’t stress about making every piece identical.
- I noticed slightly uneven candies actually look more homemade and realistic.
Step 6: Chill the Filling
- Place the tray into the refrigerator for about 45 minutes.
- The filling should feel firm enough to handle without sticking heavily to your fingers.
- If your kitchen runs warm, you may need closer to an hour.
Step 7: Melt the Chocolate
- In a microwave-safe bowl, combine the chocolate chips and coconut oil.
- Microwave in 20-second intervals, stirring after each round until smooth.
- Don’t microwave too long at once or the chocolate can turn grainy.
- The first time I melted chocolate for candy, I absolutely scorched it because I walked away “for just a second.”
Step 8: Dip the Candies
- Using a fork or dipping tool, lower each chilled candy into the melted chocolate.
- Coat fully, then lift it out and gently tap the fork against the bowl to remove extra chocolate.
- Place the coated candies back onto the parchment paper.
- Some chocolate pooling underneath is normal.
Step 9: Add Toppings
- Before the chocolate sets, sprinkle with crushed peanuts or flaky sea salt if using.
- The salt really helps balance the sweetness.
Step 10: Chill Again
- Refrigerate the candies for another 15 to 20 minutes until the chocolate firms up completely.
- The chocolate should look slightly glossy but firm to the touch.
Notes
- Use real maple syrup for the best flavor.
- Chill the filling thoroughly before dipping.
- Use roasted peanuts for extra crunch.
- Add flaky salt for better sweet-salty balance.
- Store candies chilled during warmer months.
- Dip candies quickly so the filling stays firm.