Personal Introduction
Rachael Ray Banana Bread Recipe was one of those recipes I tried on a rainy Saturday when I had three bananas sitting on my counter looking way too brown to eat. I almost tossed them out, honestly. But my mom always said overripe bananas make the best banana bread, so I figured I’d give it a shot instead.
The first time I made this, I rushed the mixing part and ended up with a loaf that was kind of dense in the middle. It still tasted good with coffee, but I noticed the texture got way better when I slowed down and stopped overmixing the batter. That little change made a huge difference.
Now this recipe has become one of my regular weekend baking habits, especially during colder months when I want the kitchen to smell warm and cozy without spending all day cooking. The smell of bananas, vanilla, and butter baking together is honestly hard to beat.
What I like most about this Rachael Ray Banana Bread Recipe is that it feels simple and realistic. No fancy ingredients. No complicated techniques. Just basic pantry stuff and a loaf pan.
I’ve also made a few small tweaks over time depending on what I had in the kitchen. Sometimes I add walnuts, sometimes chocolate chips, and one time I swapped brown sugar because I ran out of white sugar halfway through. Surprisingly, that version turned out even better.
If you’ve got ripe bananas sitting around, this is probably one of the easiest and most reliable things you can make.
Why This Recipe Works
There are a lot of banana bread recipes online, but this one works really well for everyday home baking because the balance is right.
- The bananas keep the loaf moist without making it gummy.
- Butter adds richer flavor than oil, especially the next day.
- A little vanilla softens the strong banana flavor.
- Baking soda helps the loaf rise evenly.
- The sugar level is sweet enough without tasting like cake.
- It stays soft for days if wrapped properly.
I also noticed this recipe handles small mistakes pretty well. I accidentally baked it five minutes longer once because I forgot to set a timer, and it still came out good. The edges were just a little darker.
Another thing I like is that it doesn’t need a mixer. I’ve made this whole recipe with one bowl and a fork before when I didn’t feel like washing extra dishes.
Equipment Needed
You really don’t need much for this Rachael Ray Banana Bread Recipe. Just regular kitchen tools most people already have.
- 9×5-inch loaf pan
- Mixing bowls
- Fork or potato masher
- Measuring cups and spoons
- Wooden spoon or spatula
- Butter knife
- Cooling rack
- Oven mitts
- Knife
- Cutting board
- Small pot or microwave-safe bowl for melting butter
I usually line my loaf pan with parchment paper because cleanup is easier, but greasing the pan well also works fine.
Recipe Card
Rachael Ray Banana Bread Recipe Summary
- Prep Time: 15 minutes
- Cook Time: 55 minutes
- Total Time: 1 hour 10 minutes
- Servings: 8 slices
- Cuisine: American
- Course: Bread
- Calories: Approximately 320 per serving
Ingredients
Here’s everything you’ll need for this Rachael Ray Banana Bread Recipe.
- 3 large overripe bananas
- 1/2 cup unsalted butter, melted
- 3/4 cup granulated sugar
- 2 large eggs
- 1 teaspoon vanilla extract
- 1 1/2 cups all-purpose flour
- 1 teaspoon baking soda
- 1/2 teaspoon salt
- 1/2 teaspoon ground cinnamon
- 1/2 cup chopped walnuts (optional)
- 1/2 cup semi-sweet chocolate chips (optional)
If your bananas aren’t super ripe yet, you can bake them in the oven at 300°F for about 15 minutes until the skins darken. I’ve done that before when I didn’t want to wait another day.
Step-by-Step Instructions
Step 1: Prep the Oven and Pan
Start by preheating your oven to 350°F. Grease a 9×5-inch loaf pan with butter or nonstick spray. I usually add a strip of parchment paper across the bottom too because it makes lifting the loaf out easier later.
The first time I skipped greasing the corners properly, part of the bread stuck to the pan. It still tasted fine, but it definitely didn’t look pretty.
Step 2: Mash the Bananas
Peel the bananas and place them in a large mixing bowl. Use a fork or potato masher to mash them until mostly smooth. A few small lumps are totally okay.
You want the bananas to look thick and creamy but not completely pureed. Overmixing here can make the batter a little heavy.
The smell at this point already starts to remind me of banana pancakes.
Step 3: Add the Wet Ingredients
Pour the melted butter into the mashed bananas and stir until combined. Add the sugar, eggs, and vanilla extract.
Mix everything together gently until smooth and creamy. The batter should look pale yellow with little banana specks throughout.
What worked better for me was letting the melted butter cool slightly before adding it. One time I poured it in too hot and the eggs started cooking around the edges of the bowl.
Step 4: Mix the Dry Ingredients
In a separate bowl, whisk together the flour, baking soda, salt, and cinnamon.
Slowly add the dry ingredients into the banana mixture. Stir with a wooden spoon or spatula just until no dry flour remains.
Try not to overmix the batter here. That’s probably the biggest mistake people make with banana bread. Overmixed batter usually turns dense and chewy instead of soft.
If you’re using walnuts or chocolate chips, fold them in now.
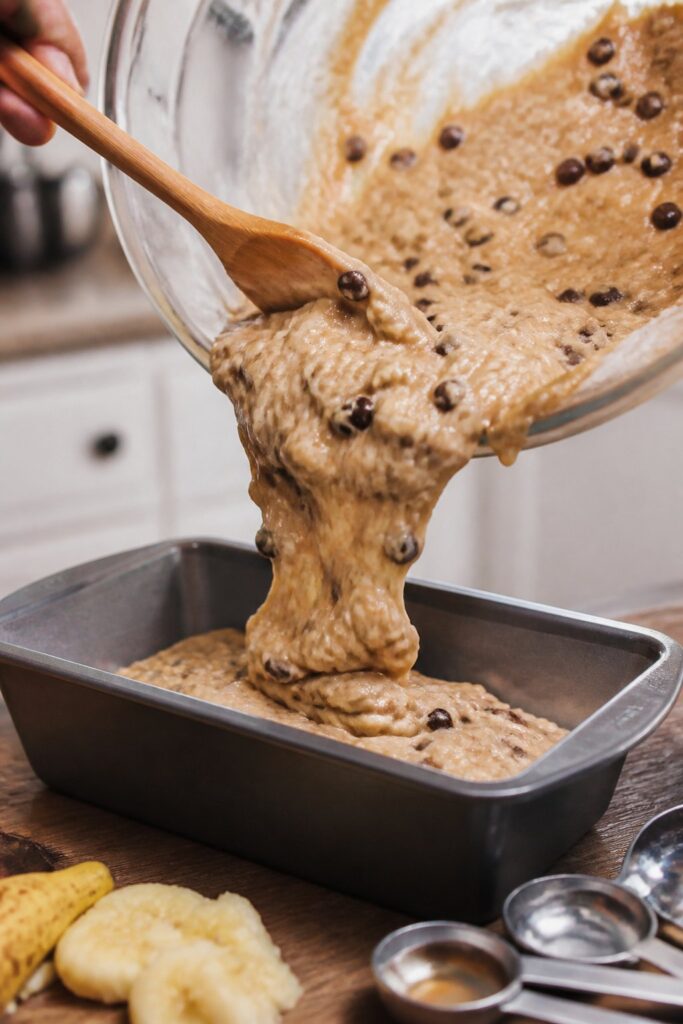
Step 5: Pour Into the Pan
Pour the batter into the prepared loaf pan and spread it evenly.
At this point the batter should look thick but still easy to spread. If it looks extremely stiff, your flour may have been packed too tightly in the measuring cup.
I usually tap the pan lightly on the counter once or twice to remove air bubbles.
Step 6: Bake the Banana Bread
Place the loaf pan on the center rack of the oven and bake for about 55 minutes.
Around the 40-minute mark, your kitchen will smell buttery and sweet. The top should turn golden brown and develop small cracks across the middle.
Check the bread by inserting a toothpick into the center. If it comes out with only a few moist crumbs, it’s done.
If the top starts browning too quickly before the middle cooks, loosely cover it with foil for the last 10 minutes.
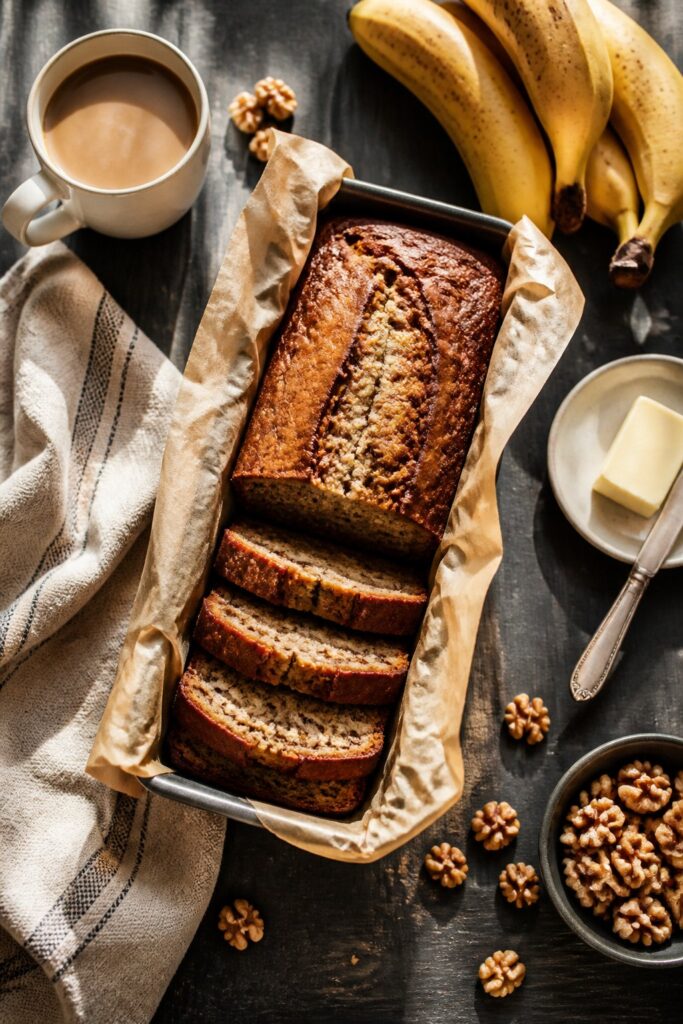
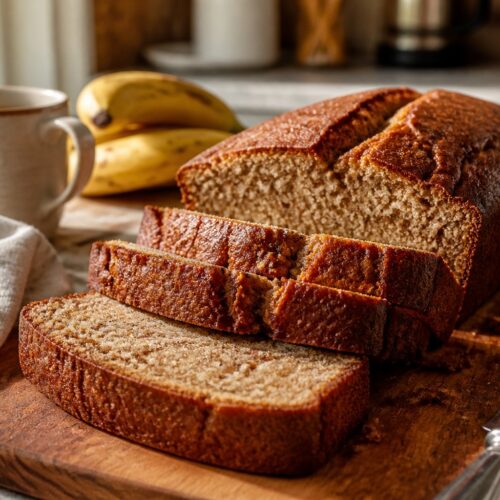
Step 7: Cool Before Slicing
Remove the banana bread from the oven and let it cool in the pan for about 15 minutes.
Then carefully transfer it to a cooling rack.
I know it’s tempting to cut into it right away, but the texture actually improves as it cools. The first time I sliced it too early, the center kind of fell apart.
Letting it rest helps the loaf firm up while staying moist.
Common Mistakes to Avoid
Using Bananas That Aren’t Ripe Enough
Yellow bananas won’t give you the same sweetness or texture. The bananas should have lots of brown spots or even mostly dark peels.
Overmixing the Batter
This is probably the biggest issue with homemade banana bread. Stir only until combined.
Adding Too Much Flour
Scooping flour directly with the measuring cup packs it down too much. Spoon the flour into the cup and level it off.
Cutting the Bread Too Soon
Warm banana bread smells amazing, but slicing it early can make the center gummy.
Forgetting to Check Early
Every oven runs differently. Mine bakes hot in the back right corner, so I usually start checking around 50 minutes.
Pro Tips
- Use bananas that are almost too ripe to eat.
- Toast walnuts before adding them for deeper flavor.
- Add a pinch of nutmeg if you like warmer spice flavor.
- Let the loaf cool fully before wrapping for storage.
- Use room-temperature eggs for smoother batter.
- Sprinkle a little coarse sugar on top before baking if you want a lightly crisp top.
I noticed the bread tastes even better the next morning after the flavors settle overnight.
Variations
Chocolate Chip Banana Bread
Add 1/2 to 3/4 cup semi-sweet chocolate chips for a sweeter version.
Walnut Banana Bread
Chopped walnuts add crunch and make the loaf feel more filling.
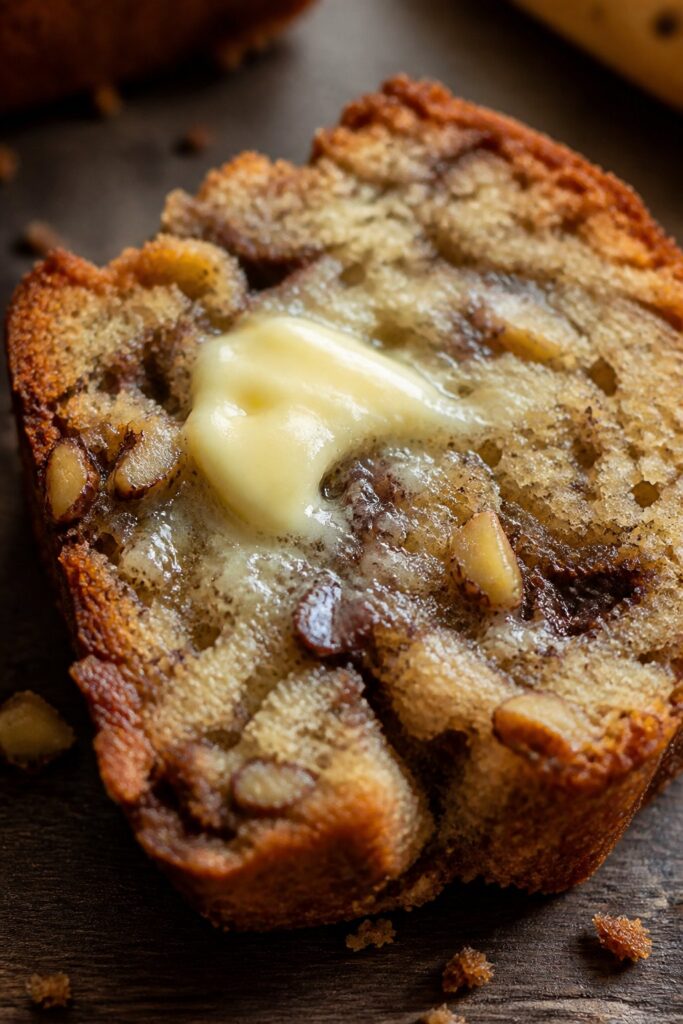
Cinnamon Swirl Banana Bread
Mix cinnamon and brown sugar together and swirl it through the batter before baking.
Muffin Version
Pour the batter into muffin tins and bake at 350°F for about 20 to 24 minutes.
Healthier Version
You can swap half the flour for whole wheat flour and reduce the sugar slightly.
I tried using all whole wheat flour once, and honestly, it came out too dense for my taste.
Serving Ideas
This Rachael Ray Banana Bread Recipe works for breakfast, snacks, or dessert.
Here are some simple serving ideas:
- Warm slice with salted butter
- Cream cheese spread
- Peanut butter drizzle
- Fresh berries on the side
- Scrambled eggs and coffee for breakfast
- Vanilla ice cream for dessert
- Hot chocolate during colder months
Sometimes I toast leftover slices lightly in a skillet with butter. That crispy edge is really good.
Make-Ahead Tips
Banana bread is actually a great make-ahead recipe.
You can bake the loaf a full day before serving because the flavor gets even better overnight.
If making ahead for guests or breakfast, let the loaf cool completely and wrap it tightly in plastic wrap or foil.
You can also freeze the whole loaf or individual slices.
I usually freeze slices separately because it makes quick breakfasts easier during busy weeks.
Storage & Reheating Tips
Room Temperature
Store the banana bread tightly wrapped at room temperature for up to 4 days.
Refrigerator
You can refrigerate it for up to 1 week, but refrigeration sometimes dries baked goods out a little.
Freezer
Wrap slices individually and freeze for up to 3 months.
Reheating
Microwave slices for about 15 seconds or warm them in a toaster oven.
I personally like reheating slices in a skillet with a tiny bit of butter. It gives the outside a light crisp texture.
FAQs
Can I use frozen bananas?
Yes. Just thaw them completely and drain excess liquid before using.
Why did my banana bread sink in the middle?
Usually this happens when the loaf is underbaked or the batter was overmixed.
Can I make this recipe without nuts?
Absolutely. The nuts are optional.
How ripe should bananas be for banana bread?
Very ripe with brown or black spots. The darker they are, the sweeter the bread will taste.
Can I use brown sugar instead of white sugar?
Yes. Brown sugar adds a deeper caramel flavor and slightly more moisture.
How do I know when banana bread is done?
Insert a toothpick into the center. If it comes out mostly clean with a few crumbs, it’s ready.
Final Thoughts
This Rachael Ray Banana Bread Recipe has honestly become one of those dependable recipes I come back to over and over again. It’s simple, forgiving, and doesn’t require anything fancy.
I like recipes that feel realistic for everyday life, and this one definitely does. You don’t need perfect bananas or expensive ingredients. Even when I’ve made little mistakes, the bread still turned out comforting and good.
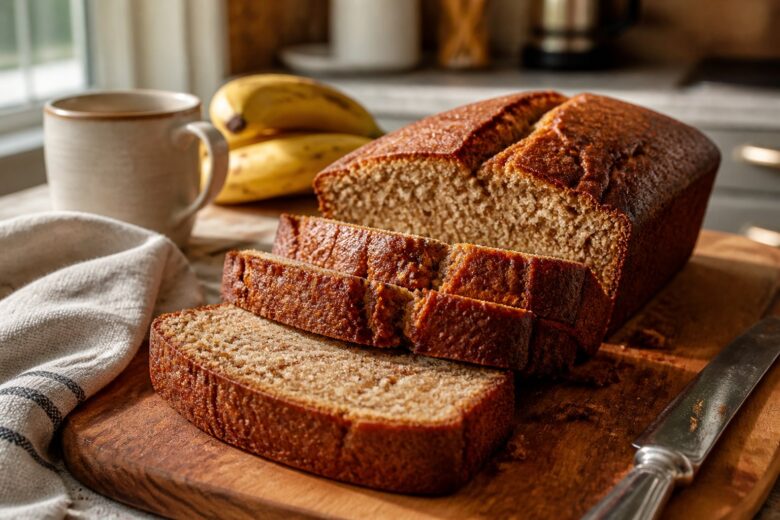
The soft texture, sweet banana flavor, and buttery smell make it one of those recipes people keep slicing “just one more piece” from.
If you’ve never made homemade banana bread before, this is a really solid place to start. And if you already bake banana bread often, this version is still worth trying because it feels easy and reliable.
Honestly, the hardest part is waiting for it to cool before cutting into it.
I hope this Rachael Ray Banana Bread Recipe becomes one of those recipes you keep tucked away for lazy weekends and overripe bananas too.
Rachael Ray Banana Bread Recipe
Equipment
- 9×5 inch loaf pan
- Mixing bowls
- Fork or potato masher
- Measuring cups and spoons
- Wooden spoon or spatula
- Butter knife
- Cooling rack
- Oven mitts
- Knife
- Cutting board
- Small pot or microwave-safe bowl for melting butter
Ingredients
- 3 large overripe bananas
- 1/2 cup unsalted butter melted
- 3/4 cup granulated sugar
- 2 large eggs
- 1 teaspoon vanilla extract
- 1 1/2 cups all-purpose flour
- 1 teaspoon baking soda
- 1/2 teaspoon salt
- 1/2 teaspoon ground cinnamon
- 1/2 cup chopped walnuts optional
- 1/2 cup semi-sweet chocolate chips optional
Instructions
Step 1: Prep the Oven and Pan
- Start by preheating your oven to 350°F. Grease a 9×5-inch loaf pan with butter or nonstick spray. I usually add a strip of parchment paper across the bottom too because it makes lifting the loaf out easier later.
- The first time I skipped greasing the corners properly, part of the bread stuck to the pan. It still tasted fine, but it definitely didn’t look pretty.
Step 2: Mash the Bananas
- Peel the bananas and place them in a large mixing bowl. Use a fork or potato masher to mash them until mostly smooth. A few small lumps are totally okay.
- You want the bananas to look thick and creamy but not completely pureed. Overmixing here can make the batter a little heavy.
- The smell at this point already starts to remind me of banana pancakes.
Step 3: Add the Wet Ingredients
- Pour the melted butter into the mashed bananas and stir until combined. Add the sugar, eggs, and vanilla extract.
- Mix everything together gently until smooth and creamy. The batter should look pale yellow with little banana specks throughout.
- What worked better for me was letting the melted butter cool slightly before adding it. One time I poured it in too hot and the eggs started cooking around the edges of the bowl.
Step 4: Mix the Dry Ingredients
- In a separate bowl, whisk together the flour, baking soda, salt, and cinnamon.
- Slowly add the dry ingredients into the banana mixture. Stir with a wooden spoon or spatula just until no dry flour remains.
- Try not to overmix the batter here. That’s probably the biggest mistake people make with banana bread. Overmixed batter usually turns dense and chewy instead of soft.
- If you’re using walnuts or chocolate chips, fold them in now.
Step 5: Pour Into the Pan
- Pour the batter into the prepared loaf pan and spread it evenly.
- At this point the batter should look thick but still easy to spread. If it looks extremely stiff, your flour may have been packed too tightly in the measuring cup.
- I usually tap the pan lightly on the counter once or twice to remove air bubbles.
Step 6: Bake the Banana Bread
- Place the loaf pan on the center rack of the oven and bake for about 55 minutes.
- Around the 40-minute mark, your kitchen will smell buttery and sweet. The top should turn golden brown and develop small cracks across the middle.
- Check the bread by inserting a toothpick into the center. If it comes out with only a few moist crumbs, it’s done.
- If the top starts browning too quickly before the middle cooks, loosely cover it with foil for the last 10 minutes.
Step 7: Cool Before Slicing
- Remove the banana bread from the oven and let it cool in the pan for about 15 minutes.
- Then carefully transfer it to a cooling rack.
- I know it’s tempting to cut into it right away, but the texture actually improves as it cools. The first time I sliced it too early, the center kind of fell apart.
- Letting it rest helps the loaf firm up while staying moist.
Notes
- Use bananas that are almost too ripe to eat.
- Toast walnuts before adding them for deeper flavor.
- Add a pinch of nutmeg if you like warmer spice flavor.
- Let the loaf cool fully before wrapping for storage.
- Use room-temperature eggs for smoother batter.
- Sprinkle a little coarse sugar on top before baking if you want a lightly crisp top.