
Personal Introduction
The first time I tried making a Auntie Anne’s Cheese Dip Recipe, I honestly didn’t think it would come close to the mall version. I remember standing in my small kitchen in Ohio, holding a half-eaten pretzel in one hand and a whisk in the other, wondering if I was wasting my time.
That cheese dip from Auntie Anne’s was something I always grabbed at the mall food court, usually after convincing myself I didn’t need it (but always getting it anyway).
This homemade version actually came out of a lazy Sunday. I had pretzels leftover from a game night, and no plan for dinner. I didn’t want anything complicated. Just something creamy, warm, and salty. That’s when I started testing my own version of this dip at home.
The first batch was too thick. The second batch was too salty. One time I even scorched the bottom because I walked away to answer a phone call. But by the third try, something clicked.
It wasn’t exactly identical to the mall version, but honestly, it was close enough that I stopped buying the packaged one. My kids even started asking for it by name, which kind of surprised me.
What I like most is that this dip doesn’t require anything fancy. You probably already have most of the ingredients sitting in your fridge. And once you make it once, you’ll probably start adjusting it without even thinking about it.
Why This Recipe Works
This copycat dip works because it’s built on simple balance instead of complicated technique. It’s creamy without being heavy, salty but not overwhelming, and smooth enough to cling to a pretzel without sliding right off.
What really makes it work at home is the butter-flour base combined with milk and cheese. That combination sounds basic, but it’s doing all the heavy lifting. The fat gives richness, the flour stabilizes the texture, and the cheese brings everything together.
I noticed that when I rush it or crank the heat too high, the texture breaks. It goes from silky to grainy in seconds. Keeping things low and slow makes a huge difference, even if it takes a few extra minutes.
Another reason this works so well is consistency. It doesn’t separate quickly, so you can actually serve it during a movie night or game day without constantly babysitting the pot.
EQUIPMENT NEEDED
Nothing fancy here, just basic kitchen tools:
- Medium saucepan or skillet
- Whisk
- Wooden spoon or silicone spatula
- Measuring cups and spoons
- Knife
- Cutting board
If you’ve cooked boxed mac and cheese before, you already have everything you need.
RECIPE CARD
Prep Time: 10 minutes
Cook Time: 12–15 minutes
Total Time: 25 minutes
Servings: 6 servings
Cuisine: American
Course: Appetizer
Calories: ~180–220 per serving (depends on cheese used)
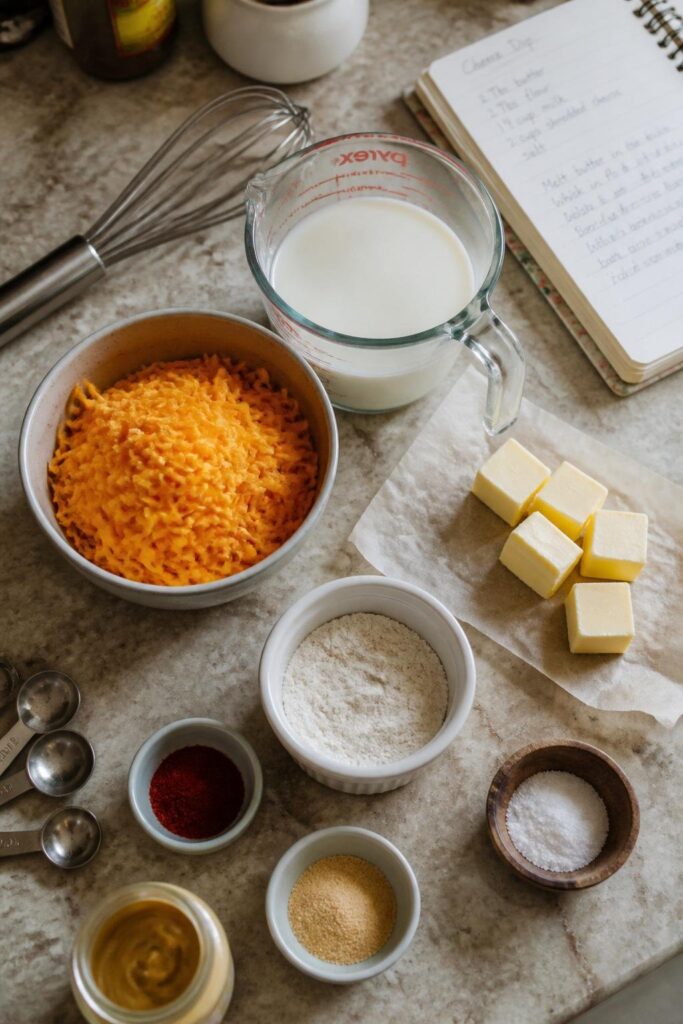
Ingredients
- 2 tablespoons unsalted butter
- 2 tablespoons all-purpose flour
- 1 cup whole milk
- 1/2 cup heavy cream
- 1 1/2 cups shredded sharp cheddar cheese
- 1/2 teaspoon salt (adjust slowly)
- 1/4 teaspoon garlic powder
- 1/4 teaspoon paprika
- 1 teaspoon yellow mustard (optional but adds that familiar tang)
Step-by-Step Instructions
Step 1: Build the base slowly
Start by melting butter in a medium saucepan over low to medium-low heat. Once it’s fully melted, sprinkle in flour while whisking constantly. It should turn into a thick paste almost immediately. Let it cook for a minute or two until it smells slightly nutty but not browned.
This step feels boring, but it sets everything up. If the base is off, the whole dip suffers later.
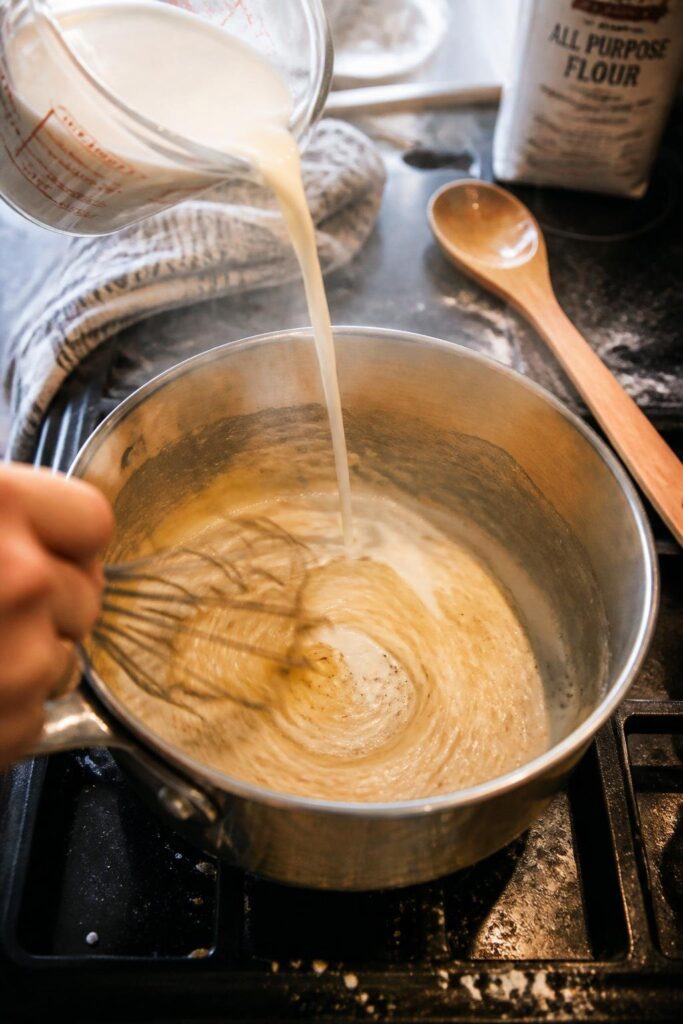
Step 2: Add milk without rushing
Slowly pour in the milk while whisking nonstop. Don’t dump it all in at once. I did that once when I was distracted, and I ended up chasing lumps around the pan for ten minutes.
Keep whisking until the mixture smooths out and starts to thicken slightly. It should look like a thin cream sauce.
Step 3: Add cream for richness
Pour in the heavy cream and stir gently. The mixture will look richer and smoother almost immediately. Let it warm through for a couple of minutes, but do not let it boil.
You should see small steam rising, but no bubbling.
Step 4: Melt in the cheese
Lower the heat and slowly add shredded cheddar in small handfuls. Stir as it melts. This is the moment the dip transforms into something familiar.
The sauce should turn thick, glossy, and smooth. If it looks too thick, add a splash of milk.
Step 5: Season and adjust
Add salt, garlic powder, paprika, and mustard if using. Stir and taste. I usually pause here and adjust salt carefully because cheddar brands vary a lot.
Step 6: Final texture check
Let it sit on low heat for another minute. The dip should coat a spoon but still drip slowly when lifted. If it feels too thick, loosen it slightly with milk.
At this point, it should smell buttery, cheesy, and slightly sharp in a way that reminds you of mall food courts and snack stands.
Common Mistakes to Avoid
- Turning the heat too high too early
- Adding cheese all at once instead of gradually
- Using pre-shredded cheese with anti-caking powder (it can turn gritty)
- Not whisking milk properly, leading to lumps
- Over-salting before tasting
- Walking away from the stove (this one is dangerous with cheese sauces)
Pro Tips
- Freshly shredded cheese melts much smoother
- Keep heat low once dairy is added
- Add milk slowly if it gets too thick
- A tiny bit of mustard adds depth without tasting like mustard
- Stir occasionally even after it’s done to prevent skin forming

Ingredient Deep Dive
Cheese choice matters
Sharp cheddar is the closest to the classic flavor. Mild cheddar makes it smoother but less punchy. A mix of both actually works best if you want balance.
Why flour is important
Flour stabilizes the sauce so it doesn’t separate. Without it, you’ll get a greasy, broken texture.
Milk vs cream balance
Milk keeps it light enough for dipping. Cream adds richness. Too much cream makes it heavy, too much milk makes it thin.
Variations
- Spicy version: add cayenne or diced jalapeños
- Smoky version: use smoked cheddar
- Extra creamy version: increase cream slightly
- Garlic-heavy version: double garlic powder
- Kid-friendly version: reduce paprika and mustard
Serving Ideas
This dip is most famous with soft pretzels, but there are plenty of ways to use it:
- Soft pretzel bites (classic pairing)
- French fries
- Tortilla chips
- Grilled cheese dipping sauce
- Roasted vegetables like broccoli or cauliflower
- Chicken tenders
For drinks, I usually go with iced tea, lemonade, or even soda during game nights.
Make-Ahead Tips
You can make this dip a few hours before serving. Just keep it covered and reheat slowly over low heat. It thickens as it sits, so always expect to add a splash of milk when reheating.
If you’re making it for a party, I recommend prepping everything ahead but cooking it fresh right before guests arrive.
Storage & Reheating Tips
Store leftovers in an airtight container in the fridge for up to 3 days. It will firm up quite a bit when cold.
To reheat:
- Stovetop: low heat + splash of milk
- Microwave: short bursts, stirring in between
Avoid high heat during reheating or the texture will break.

Nutrition Overview (Approximate)
Per serving:
- Calories: 180–220
- Fat: 15g
- Protein: 7g
- Carbs: 5g
These are estimates and depend heavily on cheese brand and cream amount.
FAQs
Why does my cheese dip turn grainy?
Usually because of high heat or cheese added too quickly.
Can I skip the flour?
You can, but the texture will be thinner and more likely to separate.
Can I use non-dairy milk?
It works, but flavor and texture change quite a bit.
What’s the closest cheese combo to the original?
Sharp cheddar with a small amount of mild cheddar.
Can I double the recipe?
Yes, just keep the heat low and stir more often.
Why does it thicken after sitting?
The starch and cheese continue to set as it cools.
Final Thoughts
This homemade version has become one of those recipes I don’t even measure carefully anymore. I just sort of know what it should look like at each stage.
The first time I got it really right, I remember dipping a warm pretzel into it and thinking, “yeah, this is dangerously close to the real thing.” That moment kind of stuck with me.
It’s not a complicated recipe, but it does reward patience. If you rush it, it reminds you immediately. If you take your time, it becomes one of those comfort foods you keep coming back to.
Now when I make it, I usually double the batch because it disappears faster than expected. And somehow, there’s always someone standing by the stove asking if it’s ready yet.

Auntie Anne’s Cheese Dip Recipe
Equipment
- Medium saucepan or skillet
- Whisk
- Wooden spoon or silicone spatula
- Measuring cups and spoons
- Knife
- Cutting board
Ingredients
- 2 tablespoons unsalted butter
- 2 tablespoons all-purpose flour
- 1 cup whole milk
- 1/2 cup heavy cream
- 1 1/2 cups shredded sharp cheddar cheese
- 1/2 teaspoon salt adjust slowly
- 1/4 teaspoon garlic powder
- 1/4 teaspoon paprika
- 1 teaspoon yellow mustard optional but adds that familiar tang
Instructions
Step 1: Build the base slowly
- Start by melting butter in a medium saucepan over low to medium-low heat. Once it’s fully melted, sprinkle in flour while whisking constantly. It should turn into a thick paste almost immediately. Let it cook for a minute or two until it smells slightly nutty but not browned.
- This step feels boring, but it sets everything up. If the base is off, the whole dip suffers later.
Step 2: Add milk without rushing
- Slowly pour in the milk while whisking nonstop. Don’t dump it all in at once. I did that once when I was distracted, and I ended up chasing lumps around the pan for ten minutes.
- Keep whisking until the mixture smooths out and starts to thicken slightly. It should look like a thin cream sauce.
Step 3: Add cream for richness
- Pour in the heavy cream and stir gently. The mixture will look richer and smoother almost immediately. Let it warm through for a couple of minutes, but do not let it boil.
- You should see small steam rising, but no bubbling.
Step 4: Melt in the cheese
- Lower the heat and slowly add shredded cheddar in small handfuls. Stir as it melts. This is the moment the dip transforms into something familiar.
- The sauce should turn thick, glossy, and smooth. If it looks too thick, add a splash of milk.
Step 5: Season and adjust
- Add salt, garlic powder, paprika, and mustard if using. Stir and taste. I usually pause here and adjust salt carefully because cheddar brands vary a lot.
Step 6: Final texture check
- Let it sit on low heat for another minute. The dip should coat a spoon but still drip slowly when lifted. If it feels too thick, loosen it slightly with milk.
- At this point, it should smell buttery, cheesy, and slightly sharp in a way that reminds you of mall food courts and snack stands.
Notes
- Freshly shredded cheese melts much smoother
- Keep heat low once dairy is added
- Add milk slowly if it gets too thick
- A tiny bit of mustard adds depth without tasting like mustard
- Stir occasionally even after it’s done to prevent skin forming